Using AWS SageMaker with minimal dependencies, part 1
Distributed model training with PyTorch Lightning
Introduction
Most of my deep learning projects are PyTorch projects, with PyTorch Lightning for distributed training. I wondered which extensions are needed to support multi-node, multi-GPU training on AWS SageMaker but with minimal changes to the codebase and with minimal dependencies to SageMaker's feature set.
For example, how do I train models without using SageMaker Studio or Notebook instances? How do I start a training run on SageMaker from a Python script on my local computer? How can I use my own Docker image for model training and not one of the prebuilt Docker images provided by SageMaker? Also, how does PyTorch Lightning fit into the SageMaker ecosystem?
This article answers these questions for distributed data-parallel training. It starts from a toy PyTorch Lightning application (training ResNet-18 on CIFAR-10) and then describes the necessary steps for running it on SageMaker. First, training is tested in a local environment with SageMaker local mode and then moved to the cloud.
Cloud-based training is described using on-demand instances. Fault-tolerant training on spot instances is covered in a follow-up article. You'll also see how training on SageMaker can be tracked with Tensorboard and how CPU/GPU usage can be monitored with AWS CloudWatch. Source code and instructions for running the examples are available on Github.
SageMaker basics
If you are new to training on AWS SageMaker I recommend reading this high-level overview first. In a nutshell, training code is provided as Docker image and uploaded to the AWS Elastic Container Registry. SageMaker uses this image to run the training code as Docker container(s) on one or more nodes.
Training input data are downloaded from a user-defined S3 bucket and made accessible to the container. Training results are uploaded to a user-defined S3 bucket. This is usually the final model plus additional training artifacts like logs and other summaries.
For development and testing purposes, the SageMaker Python SDK supports a local mode which runs training code in one or more Docker containers in a local environment. Also, training input data can be read from local disk and training output data written to a local destination. You don't even need an AWS account for running SageMaker in local mode.
Example application
This section briefly introduces code and configuration of the example application (training ResNet-18 on CIFAR-10). The next section describes the extensions required to run this application on SageMaker. These extensions are general enough to be applicable to any other PyTorch Lightning (or plain PyTorch) application.
Conda environment
We'll use a conda environment to install dependencies and run training.
#
# File: environment.yml
#

name: sagemaker-tutorial
channels:
  - pytorch
  - conda-forge
dependencies:
  - python=3.9
  - cudatoolkit=10.2
  - pytorch=1.10
  - torchvision=0.11
  - pip
  - pip:
    - pytorch-lightning==1.5.*
    - jsonargparse[signatures]==4.0.*
    - lightning-bolts==0.4.*
    - torchmetrics==0.6.*
Model
The resnet18 implementation provided by torchvision is wrapped into a more or less generic PyTorch Lightning module
with a configurable num_classes hyperparameter. The full source code is in app/model.py.
#
# File: app/model.py
#

import torchvision.models as tvm
import pytorch_lightning as pl


class ResNet18(pl.LightningModule):
    def __init__(self, num_classes: int):
        super().__init__()
        self.save_hyperparameters()
        self.model = tvm.resnet18(num_classes=num_classes)
        ...

    ...
Data
The CIFAR-10 data module is taken from PyTorch Lightning Bolts and the constructor is overridden to redefine some hyperparameter defaults and transformations. The full source code is in app/data.py.
#
# File: app/data.py
#

from pl_bolts.datamodules import cifar10_datamodule
from pytorch_lightning.utilities.cli import DATAMODULE_REGISTRY


@DATAMODULE_REGISTRY
class CIFAR10DataModule(cifar10_datamodule.CIFAR10DataModule):
    def __init__(self, num_workers: int = 1, val_split: int = 10000, normalize: bool = True, **kwargs):
        super().__init__(num_workers=num_workers, val_split=val_split, normalize=normalize, **kwargs)
        self._extend_train_transforms()  # configure training data augmentation

    def _extend_train_transforms(self) -> None:
        ...
It is registered at the PyTorch Lightning CLI registry
so that the data module can be specified and configured dynamically on the command line with
--data=CIFAR10DataModule --data.data_dir=.cache ..., for example.
Training script
The training script uses the PyTorch Lightning CLI to configure and instantiate the model, data module and trainer from command line arguments. For training and validation, the trainer API is used directly.
#
# File: app/train.py
#

import os

from pytorch_lightning.loggers import TensorBoardLogger
from pytorch_lightning.utilities.cli import LightningCLI, LightningArgumentParser

from app.model import ResNet18


class CLI(LightningCLI):
    def add_arguments_to_parser(self, parser: LightningArgumentParser):
        # Bind num_classes property of the data module to model's num_classes parameter.
        parser.link_arguments("data.num_classes", "model.num_classes", apply_on="instantiate")

        # Make TensorBoardLogger configurable under the 'logger' namespace and
        # expose flush_secs keyword argument as additional command line option.
        parser.add_class_arguments(TensorBoardLogger, "logger")
        parser.add_argument("--logger.flush_secs", default=60, type=int)

    def instantiate_trainer(self, **kwargs):
        # Instantiate trainer with configured logger as argument.
        return super().instantiate_trainer(logger=self.config_init["logger"], **kwargs)


def main():
    trainer_defaults = {
        # Trainer default configuration is defined in file app/trainer.yaml.
        "default_config_files": [os.path.join("app", "trainer.yaml")]
    }

    # Instantiate trainer, model and data module.
    cli = CLI(model_class=ResNet18, parser_kwargs=trainer_defaults, save_config_overwrite=True, run=False)

    # Run training and validation
    cli.trainer.fit(cli.model, cli.datamodule)


if __name__ == "__main__":
    main()
Extensions required by SageMaker
For running the example application on SageMaker, several extensions are needed:
- The SageMaker Python SDK and the SageMaker training toolkit
as additional dependencies in
environment.yml. - Training script extensions to configure SageMaker-specific input and output paths.
- A training script wrapper to configure a multi-node computing cluster.
- A
Dockerfilefor creating a Docker image of the example application.
Dependencies
The SageMaker Python SDK provides an API for training and deploying models on SageMaker. The SageMaker training toolkit
makes a Docker container compatible with the SageMaker training environment. Both are Python libraries and are added
as dependencies to environment.yml:
#
# File: environment.yml
#

name: sagemaker-tutorial
...
dependencies:
  ...
  - pip:
    - sagemaker
    - sagemaker-training
  ...
Training script extensions
The training script must be extended to read training input data from and write training output data to SageMaker-specific
directories. SageMaker copies training input data to a directory defined by environment variable SM_CHANNEL_TRAINING. The
application should write training output data to a directory defined by environment variable SM_OUTPUT_DATA_DIR and write
the final model to a directory defined by environment variable SM_MODEL_DIR. SageMaker copies data from these directories
to a user-defined target location. This can be a local directory in SageMaker local mode or an S3 bucket, for example.
import json
import os
import shutil

from pytorch_lightning.utilities.cli import LightningCLI, LightningArgumentParser

class CLI(LightningCLI):
    def __init__(self, *args, **kwargs):
        self.sm_training_data_dir = os.environ.get("SM_CHANNEL_TRAINING")
        self.sm_output_data_dir = os.environ.get("SM_OUTPUT_DATA_DIR")
        self.sm_model_dir = os.environ.get("SM_MODEL_DIR")

        # Names and number of hosts SageMaker is running.
        self.sm_hosts = os.environ.get("SM_HOSTS", "[\"localhost\"]")
        self.num_nodes = len(json.loads(self.sm_hosts))
        super().__init__(*args, **kwargs)

    def before_instantiate_classes(self) -> None:
        if self.sm_training_data_dir:
            self.config["data"]["init_args"]["data_dir"] = self.sm_training_data_dir

    def add_arguments_to_parser(self, parser: LightningArgumentParser):
        ...

        if self.sm_output_data_dir:
            parser.set_defaults({
                "trainer.weights_save_path": os.path.join(self.sm_output_data_dir, "checkpoints"),
                "logger.save_dir": os.path.join(self.sm_output_data_dir, "tensorboard")
            })

    def instantiate_trainer(self, **kwargs):
        # Instantiate trainer with configured logger and number of nodes as arguments.
        return super().instantiate_trainer(logger=self.config_init["logger"], num_nodes=self.num_nodes, **kwargs)


def main():
    ...

    # Instantiate trainer, model and data module.
    cli = ...

    # Run training and validation
    cli.trainer.fit(cli.model, cli.datamodule)

    if cli.trainer.is_global_zero and cli.sm_model_dir:
        # Load best checkpoint.
        ckpt_path = cli.trainer.checkpoint_callback.best_model_path
        ckpt = ResNet18.load_from_checkpoint(ckpt_path)

        # Write best model to SageMaker model directory.
        model_path = os.path.join(cli.sm_model_dir, "model.pt")
        torch.save(ckpt.model.state_dict(), model_path)

        # Checkpoint not needed (yet), delete it.
        os.remove(ckpt_path)
Here, the training script configures the data module to read training data from SM_CHANNEL_TRAINING. The trainer is
configured to write checkpoints to a subdirectory of SM_OUTPUT_DATA_DIR and the Tensorboard logger to write logs to
another subdirectory of SM_OUTPUT_DATA_DIR. After training completes, the best model is written to SM_MODEL_DIR and
the corresponding checkpoint is deleted.
Writing Tensorboard data to SM_OUTPUT_DATA_DIR has one disadvantage though: the logs aren't accessible until the end
of training. This can be fixed by configuring the logger to write to an S3 bucket directly so that training progress can
be monitored during training (see also this section).
The trainer must also be configured with the correct number of nodes SageMaker is running. This is done by counting the
number of host names in the SM_HOSTS environment variable. A complete reference on environment variables
used by SageMaker is part of the training toolkit documentation.
Computing cluster configuration
Without further configuration, the app/train.py script is able to run multi-GPU training on a single node (using a
distributed data-parallel strategy). For running distributed training on multiple nodes, PyTorch Lightning supports
several options. Here, we use the simplest
one: setting torch.distributed specific environment variables.
These are set from SageMaker specific environment variables (SM_*) in a training script wrapper:
#
# File: app/train_multi_node.py
#

import json
import os
import socket

from app import train


def main():
    os.environ["NCCL_DEBUG"] = "INFO"
    os.environ["NCCL_SOCKET_IFNAME"] = os.environ["SM_NETWORK_INTERFACE_NAME"]

    # List of nodes that participate in multi-node training.
    hosts = json.loads(os.environ["SM_HOSTS"])

    # Name and rank of current node
    host_c = os.environ['SM_CURRENT_HOST']
    rank_c = hosts.index(host_c)

    # Name and IP address of master node.
    host_0 = hosts[0]
    host_0_ip = socket.gethostbyname(host_0)

    # Set torch.distributed specific environment variables.
    os.environ["MASTER_ADDR"] = host_0_ip
    os.environ["MASTER_PORT"] = "29400"
    os.environ["WORLD_SIZE"] = str(len(hosts))
    os.environ["NODE_RANK"] = str(rank_c)

    # Call training script on current node
    train.main()


if __name__ == "__main__":
    main()
The actual training script (app/train.py) is imported and executed via train.main(). Also part of the source code is
another training script wrapper
(app/train_multi_node_torchrun.py) that uses torchrun for
running the training script on multiple nodes. The elasticity provided by this option is not needed in this specific
example though.
Docker image
For this tutorial, we create a Docker image of the example application from an ubuntu:20.04 base image instead of
using one of the existing SageMaker Docker images. The corresponding Dockerfile
first installs Miniconda3 and then creates a conda environment from environment.yml.
#
# File: docker/Dockerfile
#

FROM ubuntu:20.04

RUN apt-get install -y --no-install-recommends \
    python3.8 \
    python3-pip \
    python3.8-dev \
    build-essential \
    wget

ARG CONDA_VERSION=latest

# Install latest version of Miniconda3
RUN wget --quiet https://repo.anaconda.com/miniconda/Miniconda3-${CONDA_VERSION}-Linux-x86_64.sh -O miniconda.sh && \
    mkdir -p /opt && \
    sh miniconda.sh -b -p /opt/conda && \
    rm miniconda.sh && \
    ln -s /opt/conda/etc/profile.d/conda.sh /etc/profile.d/conda.sh && \
    echo ". /opt/conda/etc/profile.d/conda.sh" >> ~/.bashrc && \
    echo "conda activate base" >> ~/.bashrc && \
    find /opt/conda/ -follow -type f -name '*.a' -delete && \
    find /opt/conda/ -follow -type f -name '*.js.map' -delete && \
    /opt/conda/bin/conda clean -afy

ENV PATH=/opt/conda/bin:$PATH

# Location of application code as required by SageMaker.
ARG CODEPATH=/opt/ml/code

# Create sagemaker-tutorial conda environment.
COPY environment.yml $CODEPATH/environment.yml
RUN conda update -n base -c defaults conda
RUN conda env create -f $CODEPATH/environment.yml

# Copy application files.
COPY app $CODEPATH/app/


# Expose training script to SageMaker and support overriding
# at build-time. This can either be app/train_multi_node.py
# (default) or app/train_multi_node_torchrun.py.
ARG SAGEMAKER_PROGRAM=app/train_multi_node.py
ENV SAGEMAKER_PROGRAM=${SAGEMAKER_PROGRAM}

# Make all local GPUs visible
ENV NVIDIA_VISIBLE_DEVICES="all"

# Set working directory to root directory of application code
WORKDIR $CODEPATH

ENTRYPOINT ["app/train.sh"]
With the SAGEMAKER_PROGRAM environment variable, the SageMaker training toolkit is configured to run app/train_multi_node.py
on each node. This can be overridden at build time
to use app/train_multi_node_torchrun.py instead.
The training script , as well as the training toolkit itself, need an activated sagemaker-tutorial conda environment
for running. Activation of the conda environment is done in the container's entrypoint app/train.sh:
#!/bin/bash --login

#
# File: app/train.sh
#

conda activate sagemaker-tutorial
export PYTHONPATH=.

$@
For training, SageMaker runs Docker containers with train as command. This command is the first argument to the
app/train.sh entrypoint and can therefore the referenced and executed as $@, after having activated the conda
environment.
The train executable is implemented by the SageMaker training toolkit (which is completely independent of the
application-specific train* scripts). It loads and runs the script defined by the SAGEMAKER_PROGRAM environment
variable.
Training
Without SageMaker
Before running app/train.py on SageMaker (via app/train_multi_node.py), it is useful to run it directly within
the sagemaker-tutorial conda environment to check if everything works as expected. Assuming there are one or more
GPUs available, single-node (multi-)GPU training for 5 epochs can be started e.g. with:
python app/train.py \
  --data=CIFAR10DataModule \
  --data.data_dir=.cache \
  --optimizer=Adam \
  --optimizer.lr=1e-3 \
  --trainer.accelerator=gpu \
  --trainer.devices=-1 \
  --trainer.max_epochs=5 \
  --trainer.weights_save_path=logs/checkpoints \
  --logger.save_dir=logs/tensorboard \
  --logger.name=tutorial
The CIFAR10DataModule is configured to download the CIFAR-10 dataset to a local .cache directory. Checkpoints and
Tensorboard logs are written to subdirectories of logs. With the command line option --trainer.devices=-1 the trainer
is configured to run training on all available GPUs (using a distributed data-parallel trainer.strategy, as configured
in app/trainer.yaml).
With SageMaker in a local environment
Training on SageMaker in a local environment can be done with SageMaker local mode. In local mode, SageMaker uses Docker Compose to manage the lifecycle of the Docker container(s).
The central API for coordinating training is
sagemaker.estimator.Estimator. This is the place where the Docker image URI, the location of input and output data
as well as the training script arguments i.e. hyperparameters are configured.
Calling fit() on an estimator instance, with the location of training data passed as inputs argument, finally
starts training on SageMaker. For example, training on all available local GPUs can be started with:
from sagemaker import LocalSession
from sagemaker.estimator import Estimator


session = LocalSession()
estimator = Estimator(image_uri="sagemaker-tutorial",
                      role="arn:aws:iam::000000000000:role/dummy",
                      instance_type="local_gpu",
                      instance_count=1,
                      output_path="file://output",
                      sagemaker_session=session,
                      hyperparameters={
                        "data": "CIFAR10DataModule",
                        "data.batch_size": 32,
                        "optimizer": "Adam",
                        "optimizer.lr": 1e-3,
                        "trainer.accelerator": "gpu",
                        "trainer.devices": -1,
                        "trainer.max_epochs": 5,
                        "logger.name": "tutorial"
                      })

estimator.fit(inputs="file://.cache")
Training input data are taken from the local .cache directory and provided to the container in a SageMaker-specific
directory defined by the SM_CHANNEL_TRAINING environment variable. Training output data, written to directories defined
by environment variables SM_OUTPUT_DATA_DIR and SM_MODEL_DIR, are zipped and copied to a user-defined local target
directory named output.
SageMaker local mode does not yet support training with multiple instances (= containers) if instance_type=local_gpu
but multi-node training can be emulated on CPU by setting instance_type=local, instance_count=n with n greater
than 1 and setting the trainer.accelerator hyperparameter to cpu.
The SageMaker execution role can be a dummy IAM role when running in local mode. You don't even need an AWS account
or a local .aws configuration in your home directory for running in local mode. If the .aws configuration is missing,
SageMaker only requires the environment variable AWS_DEFAULT_REGION to be set to a valid region such as us-east-1,
for example.
With SageMaker in the cloud
The prerequisites for running SageMaker in the cloud are described here.
Before training can be started, the sagemaker-tutorial Docker image must be uploaded to the AWS Elastic Container
Registry and the training dataset to S3 (instructions here).
Switching to multi-node, multi-GPU training is then trivial. The differences to local mode w.r.t. Estimator
configuration are:
image_urimust be the URI of thesagemaker-tutorialimage in the AWS Elastic Container Registry.rolemust be a valid SageMaker execution role, created during onboarding, for example.instance_typeshould be an accelerated computing instance type (ml.g*.*orml.p*.*).output_pathshould be a valid S3 path (or any other supported remote destination).- the
inputsargument of the estimator'sfitmethod should be an S3 path containing training input data.
This is shown in the following code template. Replace <account-id>, <region>, <role-name> and <my-bucket>
with appropriate values for your AWS environment:
from sagemaker import Session
from sagemaker.estimator import Estimator


session = Session()
estimator = Estimator(image_uri="<account-id>.dkr.ecr.<region>.amazonaws.com/sagemaker-tutorial:latest",
                      role="arn:aws:iam:<account-id>::role/<role-name>",
                      instance_type="ml.g4dn.12xlarge",
                      instance_count=2,
                      output_path="s3://<my-bucket>/output",
                      sagemaker_session=session,
                      hyperparameters={
                        "data": "CIFAR10DataModule",
                        "data.batch_size": 32,
                        "optimizer": "Adam",
                        "optimizer.lr": 1e-3,
                        "trainer.accelerator": "gpu",
                        "trainer.devices": -1,
                        "trainer.max_epochs": 5,
                        "logger.save_dir": "s3://<my-bucket>/tensorboard",
                        "logger.flush_secs": 5,
                        "logger.name": "tutorial"
                      })

estimator.fit(inputs="s3://<my-bucket>/datasets/cifar-10")
The hyperparameters passed to the training script are identical to local mode except that the Tensorboard logger is configured to write logs directly to an S3 destination and flush its buffer every 5 seconds (default is 120). This allows monitoring progress while training is running. Tensorboard can read logs directly from an S3 path:
tensorboard --logdir s3://<my-bucket>/tensorboard
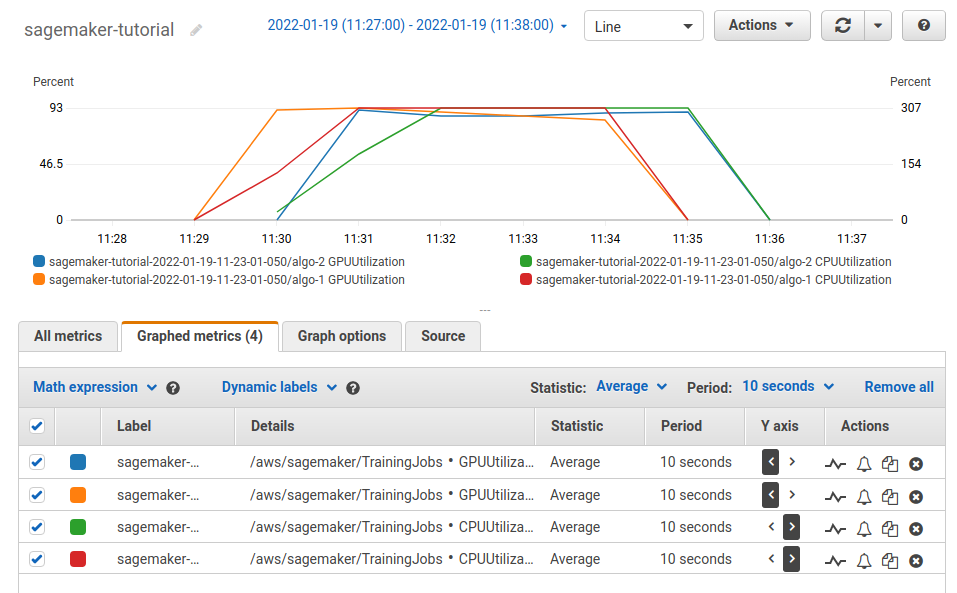
SageMaker automatically logs GPU and CPU usage together with other metrics to AWS CloudWatch. These can be tracked
while training on SageMaker is in progress. The following output was taken from a training run on 2 ml.g4dn.xlarge
instances (with only 1 GPU per instance, for testing purposes). GPU usage is on the left y-axis, CPU usage on the right
y-axis.
Conclusion
Migrating an existing PyTorch Lightning application to multi-node, multi-GPU training on SageMaker can be done with relatively little effort. This article described a simple approach for which several alternatives and optimizations exist. However, the outlined approach should work quite well for a good number of use cases.
I should also mention that grid.ai, the company founded by the original creators of PyTorch Lightning, provides an alternative solution for distributed training of PyTorch Lightning applications in the cloud.
Acknowledgements
Many thanks to Christoph Stumpf for useful feedback on this article and associated code.
Comments